merkonisch
Yeni Üye
- Katılım
- 2 Mayıs 2025
- Mesajlar
- 6
Not
Topluluk katkisiyla bir dokumani ne kadar zenginlestirebiliriz bunu anlamak istiyorum
arastirmalarimi ingilizce kaynaklardan yaptigim icin orjinal metinleri de koydun lakin sizden gelecekleri ayni sekilde katki yapan kisi bilgisi ile beraber yerlestirecegim
dinamik bir dokuman yapmaya calisiyorum surekli guncellenebilen
biseyler hakkinda ongoruye sahip olmak icin bunu deniyorum
okuyup yorum yapacak herkeze simdiden tesekkurler
Bu ornek metin Visual studio referans alinarak hazirlandi ama sizin katkilariniz bambaska alanlardan da olabilir
SOLUTION EXPLORER HAKKINDA DERLEME
Most of the time, when you create or open an application,
or for that matter just a single file,
Visual Studio 2017 uses the concept of a solution to tie everything together.
Çoğu zaman, bir uygulama oluşturduğunuzda veya açtığınızda
veya bu konuda sadece tek bir dosya açtığınızda,
Visual Studio 2017 her şeyi bir araya getirmek için bir çözüm kavramını kullanır.


For most situations (and definitely for most existing projects),
the solution is the root element of a project.
Çoğu durumda (ve kesinlikle mevcut projelerin çoğunda)
çözüm, bir projenin kök öğesidir.
Typically, a solution is
made up of one or more projects,
each of which can have multiple items associated with it.
Genellikle bir çözüm,
bir veya daha fazla projeden oluşur.
her biri birden fazla öğeyle ilişkilendirilebilen
The Solution Explorer tool window (Ctrl+Alt+L) provides a convenient visual representation
of the solution, projects, and items.
Çözüm Gezgini araç penceresi (Ctrl+Alt+L), kullanışlı bir görsel temsilini sağlar
çözümün, projelerin ve öğelerin
#SOLUTION STRUCTURE ÇÖZÜM YAPISI

Whenever you work within Visual Studio, you have a solution open.
Visual Studio içinde her çalıştığınızda, açık bir çözümünüz olur.
When you edit an ad hoc file, this is a temporary solution
that you can elect to discard when you complete your work.
Bir özel dosyayı düzenlediğinizde, bu geçici bir çözümdür
işinizi tamamladığınızda atmayı seçebileceğiniz
However, the solution enables you to manage the files that you’re currently working with,
Bununla beraber, çözüm şu anda üzerinde çalıştığınız dosyaları yönetmenizi sağlar,
so in most cases saving the solution
means that you can return to what you were doing at a later date
without having to locate and reopen the files on which you were working.
bu nedenle çoğu durumda çözümü kaydetmek,
daha sonra yaptığınız işe geri dönebileceğiniz anlamına gelir.
üzerinde çalıştığınız dosyaları bulup yeniden açmak zorunda kalmadan
A solution should be thought of as a container of related projects.
Bir çözüm, ilgili projelerin bir kapsayıcısı olarak düşünülmelidir.
The projects within a solution do not need to be of the same language or project type.
Bir çözüm içindeki projelerin aynı dil veya proje türünde olması gerekmez.
For example, a single solution could contain
an ASP.NET web application written in Visual Basic,
an F# library, and a C# WPF application.
Örneğin, tek bir çözüm, içerebilir
Visual Basic'te yazılmış bir ASP.NET web uygulaması,
bir F# kütüphanesi ve bir C# WPF uygulaması
The solution enables you to open all these projects together in the IDE
and manage the build and deployment configuration for them as a whole
Çözüm, tüm bu projeleri IDE'de birlikte açmanıza olanak tanır
ve bunlar için derleme ve dağıtım yapılandırmasını bir bütün olarak yönetmenize (olanak tanır)
The most common way to structure applications written within Visual Studio
is to have a single solution containing a number of projects.
Visual Studio içinde yazılmış uygulamaları yapılandırmanın en yaygın yolu,
bir dizi proje içeren tek bir çözüme sahip olmaktır.
Each project can then be made up of a series of both code files and folders.
Her proje daha sonra bir dizi kod dosyası ve klasörden oluşabilir.
BURAYA KATKI SAGLAYABILIRSINIZ
SOLUTION EXPLORER GIBI BIR YAPI BASKA IDELERDE VEYA ORTAMLARDA mesela Atollic Tia Portal matlab NASIL ADLANDRILIYOR
BURALARDA GOREVI NEDIR
veya SOLUTION EXPLORER HAKKINDA neler soyleyebilirsiniz VS veya baska ortamlar dahil
yorumlarinizla metni zenginlestirecegim
bana gore Solution Explorer projenin geneline erisebilecegimiz bir kullanim kolayligi saglayan arac gibi geldi
Hani Age of Empires oynarken sol altta oyun haritasi olur da tum alani izleyebilirsiniz ve ona gore nelere sahip oldugunuzu genel hatlariyla gorebilirsiniz ya onun gibi/
#SOLUTION FILE FORMAT / ÇÖZÜM DOSYASI BİÇİMİ
Visual Studio 2017 actually creates two files for a solution, with extensions .suo and .sln (solution file).
Visual Studio 2017 aslında bir çözüm için .suo ve .sln (çözüm dosyası) uzantılı iki dosya oluşturur.
The first of these is a rather uninteresting binary file and hence difficult to edit.
Bunlardan ilki oldukça ilgi çekici olmayan bir ikili dosyadır ve dolayısıyla düzenlenmesi zordur.
#SOLUTION FILE FORMAT - suo file
It contains userspecific information — for example, which files were open when the solution was last closed and the location of breakpoints.
Kullanıcıya özgü bilgiler içerir — örneğin, çözüm en son kapatıldığında hangi dosyaların açık olduğu ve kesme noktalarının konumu.
This file is marked as hidden,
so it won’t appear in the solution folder using Windows Explorer unless you enable the option to show hidden files.
Bu dosya gizli olarak işaretlenmiştir,
bu nedenle gizli dosyaları gösterme seçeneğini etkinleştirmediğiniz sürece Windows Gezgini'ni kullanarak çözüm klasöründe görünmez.
User information file that stores data in a structured binary format;
referenced by VSPackages created with Visual Studio;
opened by the LoadUserOptions Method
and modified by the WriteUserOptions and SaveUserOptions methods.
Verileri yapılandırılmış ikili biçimde depolayan;
Visual Studio ile oluşturulan VSPackages tarafından başvurulan;
LoadUserOptions Yöntemi tarafından açılan
ve WriteUserOptions ve SaveUserOptions yöntemleri tarafından değiştirilen kullanıcı bilgi dosyası.
Additionally, since SUO files change each time you use an associated Visual Studio solution (.SLN)
and they are saved in a binary format, they become difficult to place under version control.
Ayrıca, SUO dosyaları ilişkili bir Visual Studio çözümü (.SLN) kullandığınız her seferinde değiştiğinden
ve ikili biçimde kaydedildiğinden, sürüm denetimi altına alınmaları zorlaşır.
BURAYA KATKI SAGLAYABILIRSINIZ
suo file ile ilgili biraz daha detaylandirma yapablirim
#SOLUTION FILE FORMAT - sln file
A .sln file, short for solution file, is a text-based file generated by Visual Studio
to store information about the projects in your solution.
Çözüm dosyası anlamına gelen .sln dosyası, Visual Studio tarafından oluşturulan metin tabanlı bir dosyadır.
çözümünüzdeki projeler hakkında bilgi depolamak için
It acts as a container for multiple projects, facilitating their organization, build configurations, and dependencies.
Birden fazla proje için bir kapsayıcı görevi görerek bunların organizasyonunu, yapılandırmalarını ve bağımlılıklarını kolaylaştırır.
The .sln solution file contains information about the solution,
such as the list of projects, build configurations, and other settings that are not project-specific.
.sln çözüm dosyası, çözüm hakkında bilgi içerir
proje listesi, build yapılandırmaları ve projeye özgü olmayan diğer ayarlar gibi
This file plays a crucial role in managing your solution and project configurations.
Bu dosya çözümünüzü ve proje yapılandırmalarınızı yönetmede önemli bir rol oynar.
Unlike many files used by Visual Studio 2017,
the solution file is not an XML document.
Visual Studio 2017 tarafından kullanılan birçok dosyanın aksine,
çözüm dosyası bir XML belgesi değildir.
Understanding the structure of the .sln file is key to efficiently managing your C# projects.
.sln dosyasının yapısını anlamak, C# projelerinizi verimli bir şekilde yönetmek için önemlidir.
Instead, it stores information in blocks, as shown in the following example solution file:
Bunun yerine, aşağıdaki örnek çözüm dosyasında gösterildiği gibi bilgileri bloklar halinde depolar:

An SLN file is a structure file used for organizing projects in Microsoft Visual Studio.
SLN dosyası, Microsoft Visual Studio'da projeleri düzenlemek için kullanılan bir yapı dosyasıdır.
It contains text-based information about the project environment and project state.
Proje ortamı ve proje durumu hakkında metin tabanlı bilgiler içerir.
When opened, the preSolution, Project, and postSolution information is read from the SLN file.
Açıldığında, preSolution, Project ve postSolution bilgileri SLN dosyasından okunur.
This data is used to load the solution, projects within the solution, and any persisted information attached to the solution.
Bu veriler çözümü, çözüm içindeki projeleri ve çözüme eklenen kalıcı bilgileri yüklemek için kullanılır.
SLN files are similar to Windows Program Group (.VBG) files used by Visual Basic.
SLN dosyaları, Visual Basic tarafından kullanılan Windows Program Group (.VBG) dosyalarına benzer.
#SOLUTION PROPERTIES
Solution properties are stored in a Solution User Options (.suo) file.
Çözüm özellikleri bir Çözüm Kullanıcı Seçenekleri (.suo) dosyasında saklanır.

To access properties on the solution, right-click the solution node in Solution Explorer and select Properties.
Çözümdeki özelliklere erişmek için Çözüm Gezgini'nde çözüm düğümüne sağ tıklayın ve Özellikler'i seçin.
What you see in the context menu from the Solution node also depends on your project type, programming language, or platform.
Çözüm düğümündeki bağlam menüsünde gördükleriniz ayrıca proje türünüze, programlama dilinize veya platformunuza da bağlıdır.

You have three options when defining the startup project for an application,
and they’re somewhat self-explanatory.
Bir uygulama için startup project tanımlarken üç seçeneğiniz vardır
ve bunlar bir bakıma kendi kendini açıklar.
Selecting Current Selection starts the project
that has current focus in the Solution Explorer.
Current selection'i seçmek, projeyi başlatır
Solution Explorer de geçerli odak noktası olan (projeyi)
Single Startup Project ensures that the same project starts up each time.
Single Startup Project, her seferinde aynı projenin başlatılmasını sağlar.
This is the default selection
because most applications have only a single startup project.
Bu, varsayılan seçimdir
çünkü çoğu uygulamada yalnızca tek bir başlangıç projesi vardır.
You can use the drop-down list to indicate the single project that you need to start.
Başlatmanız gereken tek projeyi belirtmek için açılır listeyi kullanabilirsiniz.
The last option, Multiple Startup Projects,
allows for multiple projects to be started in a particular order.
Son seçenek olan Çoklu Başlangıç Projeleri,
birden fazla projenin belirli bir sırayla başlatılmasına olanak tanır.

This can be useful
if you have a client/server application specified in a single solution
and you want them both to be running.
Bu, yararlı olabilir
tek bir çözümde belirtilen bir istemci/sunucu uygulamanız varsa
ve her ikisinin de çalışmasını istiyorsanız
When running multiple projects,
it is also relevant to control the order in which they start up.
Birden fazla proje çalıştırırken,
bunların başlatılma sırasını kontrol etmek de önemlidir.
Use the up and down arrows next to the project list
to control the order in which projects are started.
proje listesinin yanındaki yukarı ve aşağı oklarını kullanın.
Projelerin başlatıldığı sırayı kontrol etmek için
Visual Studio allows you to specify how more than one project is run when you press F5 (Start with Debugging), or Ctrl+F5 (Start without debugging), or use the toolbar button to launch your application.
Visual Studio, F5'e (Hata Ayıklamayla Başlat) veya Ctrl+F5'e (Hata Ayıklama Olmadan Başlat) bastığınızda
veya uygulamanızı başlatmak için araç çubuğu düğmesini kullandığınızda birden fazla projenin nasıl çalıştırılacağını belirtmenize olanak tanır.
In this way, you could start multiple sites, apps, or services that depend on each other to work correctly during a debug session or just running and testing locally.
Bu şekilde, bir hata ayıklama oturumu sırasında veya yalnızca yerel olarak çalıştırıp test ederken doğru şekilde çalışmak için birbirine bağlı birden fazla site, uygulama veya hizmet başlatabilirsiniz.
 Solution Properties - Common Properties.png")
The Project Dependencies section is used to indicate other projects
on which a specific project is dependent.
Proje Bağımlılıkları bölümü, diğer projeleri belirtmek için kullanılır
belirli bir projenin bağımlı olduğu (projeleri)

As shown in the pictures all the dependent projects are “Checked” .
Resimlerde görüldüğü gibi tüm bağımlı projeler “Checked”.
For the most part, Visual Studio manages this for you
as you add and remove Project references for a given project.
Visual Studio, çoğu durumda bunu sizin için yönetir
belirli bir proje için Proje referansları eklerken ve kaldırırken
However, sometimes you may want to create dependencies
between projects to ensure that they are built in the correct order.
Ancak bazen, bağımlılıklar oluşturmak isteyebilirsiniz
doğru sırayla oluşturulduklarından emin olmak için projeler arasında
Visual Studio uses its list of dependencies
to determine the order in which projects should be built.
Visual Studio, bağımlılıklar listesini kullanır
projelerin oluşturulacağı sırayı belirlemek için
This window prevents you from inadvertently adding circular references
and from removing necessary project dependencies.
Bu pencere, yanlışlıkla dairesel referanslar eklemenizi
ve gerekli proje bağımlılıklarını kaldırmanızı önler.
You can also visualize the dependency of projects using Code Map and I personally prefer this options.
Ayrıca projelerin bağımlılığını Code Map kullanarak görselleştirebilirsiniz ve ben şahsen bu seçeneği tercih ediyorum.
In this case, you don’t need to select individual projects from the dropdown to verify the dependency;
as this provides a complete view of dependencies.
Bu durumda, bağımlılığı doğrulamak için açılır listeden tek tek projeleri seçmenize gerek kalmaz;
çünkü bu, bağımlılıkların tam bir görünümünü sağlar.
The generated code map can display all the dependency references together.
Oluşturulan kod haritası, tüm bağımlılık referanslarını birlikte görüntüleyebilir.
Navigate to Architecture –> “Generate Code Map for Solution”
Mimariye gidin –> “Çözüm için Kod Haritası Oluştur”

This will generated the nice dependency diagram for the projects.
Bu, projeler için güzel bir bağımlılık diyagramı oluşturacaktır.
As shown in the below images, you can see how the projects / libraries are dependent on each other in a single view.
Aşağıdaki resimlerde gösterildiği gibi, projelerin / kütüphanelerin tek bir görünümde birbirlerine nasıl bağımlı olduğunu görebilirsiniz.

In the Debug Source Files section,
you can provide a list of directories
through which Visual Studio can search for source files when debugging.
Hata Ayıklama Kaynak Dosyaları bölümünde,
dizinlerin bir listesini sağlayabilirsiniz
Visual Studio'nun hata ayıklama sırasında kaynak dosyalarını arayabileceği (dizinlerin)

This property page specifies where the debugger will look for source files when debugging the solution.
Bu özellik sayfası, hata ayıklayıcının çözümü hata ayıklarken kaynak dosyalarını nerede arayacağını belirtir.
This is the default list that is searched before the Find Source dialog displays.
Bu, Kaynak Bul iletişim kutusu görüntülenmeden önce aranan varsayılan listedir.
You can also list source files
that Visual Studio should not try to locate.
Ayrıca, kaynak dosyalarını da listeleyebilirsiniz
Visual Studio'nun bulmaya çalışmaması gereken
If you click Cancel when prompted to locate a source file,
the file will be added to this list.
Bir kaynak dosyasını bulmanız istendiğinde İptal'e tıklarsanız,
dosya bu listeye eklenir.
The Code Analysis Settings section is available
only in the Visual Studio Enterprise edition.
Kod Analizi Ayarları bölümü kullanılabilir
yalnızca Visual Studio Enterprise sürümünde
This allows you to select the static code analysis rule set
that will be run for each project.
Bu, statik kod analizi kural kümesini seçmenize olanak tanır
her proje için çalıştırılacak
#Configuration Properties
 Configuration Properties.png")
Both projects and solutions have build configurations associated with them
that determine which items are built and how.
Hem projeler hem de çözümler, kendileriyle ilişkili build yapılandırmalarına sahiptir
hangi öğelerin nasıl oluşturulacağını belirleyen
It can be somewhat confusing because there is actually no correlation between
a project configuration, which determines how things are built,
and a solution configuration, which determines which projects are built,
other than they might have the same name.
Aslında arasında hiçbir ilişki olmadığından biraz kafa karıştırıcı olabilir
Bir project configuration, işlerin nasıl inşa edileceğini belirleyen
ve bir solution configuration, hangi projelerin inşa edileceğini belirleyen
aynı ada sahip olmaları dışında (hiçbir ilişki olmadığından)
A new solution defines both Debug and Release (solution) configurations,
which correspond to building all projects within the solution in Debug or Release (project) configurations.
bir new solution, Debug ve Release (çözüm) yapılandırmalarını tanımlar
ve bunlar, çözüm içindeki tüm projelerin Debug veya Release (proje) yapılandırmalarında oluşturulmasına karşılık gelir.
For example, a new solution configuration called Test can be created, which consists of two projects:
Örneğin, Test adlı yeni bir new solution oluşturulabilir ve bu yapılandırma iki projeden oluşur:
MyClassLibrary and MyClassLibraryTest.
When you build your application in Test configuration,
you want MyClassLibrary to be built in Release mode so that you’re testing as close to what you would release as possible.
Uygulamanızı Test yapılandırmasında oluşturduğunuzda,
MyClassLibrary'nin Release modunda oluşturulmasını istersiniz, böylece mümkün olduğunca release'e yakın testler yaparsınız.
However, to step through your test code, you want to build the test project in Debug mode.
Ancak, test kodunuzda adım adım ilerlemek için test projesini Hata Ayıklama modunda derlemek istersiniz.
When you build in Release mode, you don’t want the Test solution to be built or deployed with your application.
Release modunda derleme yaptığınızda, Test çözümünün uygulamanızla birlikte derlenmesini veya dağıtılmasını istemezsiniz.
In this case, you can specify in the Test solution configuration
that you want the MyClassLibrary project to be built in Release mode
and that the MyClassLibraryTest project should not be built.
Bu durumda, Test çözümü yapılandırmasında belirtebilirsiniz
Bu durumda, Test çözümü yapılandırmasında MyClassLibrary projesinin Release modunda derlenmesini
ve MyClassLibraryTest projesinin derlenmemesi gerektiğini belirtebilirsiniz.
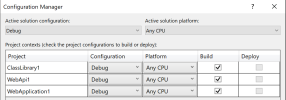
The Configuration drop-down contains each of the available solution configurations
(Debug and Release by default, Active, and All).
Yapılandırma açılır menüsü, mevcut çözüm yapılandırmalarının her birini içerir
(varsayılan olarak Hata Ayıklama ve Yayınlama, Etkin ve Tüm).

Similarly, the Platform drop-down contains each of the available platforms.
Benzer şekilde, Platform açılır menüsü mevcut platformların her birini içerir.
Whenever these drop-downs appear and are enabled,
you can specify the settings on that page on a per-configuration and per-platform basis.
Bu açılır menüler göründüğünde ve etkinleştirildiğinde,
o sayfadaki ayarları yapılandırma ve platform bazında belirtebilirsiniz.
You can also use the Configuration Manager button to add additional solution configurations and platforms
Ek çözüm yapılandırmaları ve platformlar eklemek için Configuration Manager butonunu da kullanabilirsiniz

When adding solution configurations,
there is an option (checked by default) to create corresponding project configurations for existing projects
(-- projects will be set to build with this configuration by default for this new solution configuration --),
and an option to base the new configuration on an existing configuration.
Çözüm yapılandırmaları eklerken,
mevcut projeler için karşılık gelen proje yapılandırmalarını oluşturma seçeneği (varsayılan olarak işaretlidir)
(-- projeler, bu yeni çözüm yapılandırması için varsayılan olarak bu yapılandırmayla oluşturulacak şekilde ayarlanacaktır--)
ve yeni yapılandırmayı mevcut bir yapılandırmaya dayandırma seçeneği vardır.
If the Create Project Configurations option is checked
and the new configuration is based on an existing configuration,
the new project configuration copies the project configurations specified for the existing configuration.
Proje Yapılandırmalarını Oluştur seçeneği işaretliyse
ve yeni yapılandırma mevcut bir yapılandırmaya dayanıyorsa,
yeni proje yapılandırması mevcut yapılandırma için belirtilen proje yapılandırmalarını kopyalar.
The other thing you can specify in the solution configuration file is
the type of CPU for which you are building.
Çözüm yapılandırma dosyasında belirtebileceğiniz diğer şey,
oluşturduğunuz CPU türüdür.
This is particularly relevant if you want to deploy to 64-bit architecture machines.
Bu, özellikle 64 bit mimarili makinelere dağıtım yapmak istiyorsanız önemlidir.
The options available for creating new platform configurations are
limited by the types of CPU available: x86 and x64.
Yeni platform yapılandırmaları oluşturmak için kullanılabilen seçenekler,
kullanılabilen CPU türleriyle sınırlıdır: x86 ve x64.
You can reach all these solution settings directly from the right-click context menu
from the Solution node in the Solution Explorer window.
Tüm bu çözüm ayarlarına doğrudan sağ tıklama context menüsünden ulaşabilirsiniz
Solution Explorer penceresindeki Solution node dan .
Whereas the Set Startup Projects menu item opens the Solution Configuration window,
the Configuration Manager, Project Dependencies, and Project Build Order items
open the Configuration Manager and Project Dependencies windows.
Başlangıç Projelerini Ayarla menü öğesi Çözüm Yapılandırma penceresini açarken,
Yapılandırma Yöneticisi, Proje Bağımlılıkları ve Proje Yapım Sırası öğeleri
Yapılandırma Yöneticisi ve Proje Bağımlılıkları pencerelerini açar.
The Project Dependencies and Project Build Order menu items
will be visible only if you have more than one project in your solution.
Proje Bağımlılıkları ve Proje Yapım Sırası menü öğeleri
yalnızca çözümünüzde birden fazla proje varsa görünür olacaktır.
When the Project Build Order item is selected,
this opens the Project Dependencies window
and lists the build order, as shown in Figure 6-4.
Proje Yapım Sırası öğesi seçildiğinde,
bu Proje Bağımlılıkları penceresini açar
ve Şekil 6-4'te gösterildiği gibi yapı sırasını listeler.
 Project Dependencies.png")
This tab reveals the order in which projects will be built, according to the dependencies.
Bu sekme, projelerin bağımlılıklara göre hangi sırayla oluşturulacağını gösterir.
This can be useful if you maintain references to project binary assemblies rather than Project references,
and it can be used to double-check that projects are built in the correct order.
Bu, Proje referansları yerine proje ikili derlemelerine referanslar tutuyorsanız yararlı olabilir
ve projelerin doğru sırayla oluşturulduğunu iki kez kontrol etmek için kullanılabilir.
Topluluk katkisiyla bir dokumani ne kadar zenginlestirebiliriz bunu anlamak istiyorum
arastirmalarimi ingilizce kaynaklardan yaptigim icin orjinal metinleri de koydun lakin sizden gelecekleri ayni sekilde katki yapan kisi bilgisi ile beraber yerlestirecegim
dinamik bir dokuman yapmaya calisiyorum surekli guncellenebilen
biseyler hakkinda ongoruye sahip olmak icin bunu deniyorum
okuyup yorum yapacak herkeze simdiden tesekkurler
Bu ornek metin Visual studio referans alinarak hazirlandi ama sizin katkilariniz bambaska alanlardan da olabilir
SOLUTION EXPLORER HAKKINDA DERLEME
Most of the time, when you create or open an application,
or for that matter just a single file,
Visual Studio 2017 uses the concept of a solution to tie everything together.
Çoğu zaman, bir uygulama oluşturduğunuzda veya açtığınızda
veya bu konuda sadece tek bir dosya açtığınızda,
Visual Studio 2017 her şeyi bir araya getirmek için bir çözüm kavramını kullanır.
For most situations (and definitely for most existing projects),
the solution is the root element of a project.
Çoğu durumda (ve kesinlikle mevcut projelerin çoğunda)
çözüm, bir projenin kök öğesidir.
Typically, a solution is
made up of one or more projects,
each of which can have multiple items associated with it.
Genellikle bir çözüm,
bir veya daha fazla projeden oluşur.
her biri birden fazla öğeyle ilişkilendirilebilen
The Solution Explorer tool window (Ctrl+Alt+L) provides a convenient visual representation
of the solution, projects, and items.
Çözüm Gezgini araç penceresi (Ctrl+Alt+L), kullanışlı bir görsel temsilini sağlar
çözümün, projelerin ve öğelerin
#SOLUTION STRUCTURE ÇÖZÜM YAPISI
Whenever you work within Visual Studio, you have a solution open.
Visual Studio içinde her çalıştığınızda, açık bir çözümünüz olur.
When you edit an ad hoc file, this is a temporary solution
that you can elect to discard when you complete your work.
Bir özel dosyayı düzenlediğinizde, bu geçici bir çözümdür
işinizi tamamladığınızda atmayı seçebileceğiniz
However, the solution enables you to manage the files that you’re currently working with,
Bununla beraber, çözüm şu anda üzerinde çalıştığınız dosyaları yönetmenizi sağlar,
so in most cases saving the solution
means that you can return to what you were doing at a later date
without having to locate and reopen the files on which you were working.
bu nedenle çoğu durumda çözümü kaydetmek,
daha sonra yaptığınız işe geri dönebileceğiniz anlamına gelir.
üzerinde çalıştığınız dosyaları bulup yeniden açmak zorunda kalmadan
A solution should be thought of as a container of related projects.
Bir çözüm, ilgili projelerin bir kapsayıcısı olarak düşünülmelidir.
The projects within a solution do not need to be of the same language or project type.
Bir çözüm içindeki projelerin aynı dil veya proje türünde olması gerekmez.
For example, a single solution could contain
an ASP.NET web application written in Visual Basic,
an F# library, and a C# WPF application.
Örneğin, tek bir çözüm, içerebilir
Visual Basic'te yazılmış bir ASP.NET web uygulaması,
bir F# kütüphanesi ve bir C# WPF uygulaması
The solution enables you to open all these projects together in the IDE
and manage the build and deployment configuration for them as a whole
Çözüm, tüm bu projeleri IDE'de birlikte açmanıza olanak tanır
ve bunlar için derleme ve dağıtım yapılandırmasını bir bütün olarak yönetmenize (olanak tanır)
The most common way to structure applications written within Visual Studio
is to have a single solution containing a number of projects.
Visual Studio içinde yazılmış uygulamaları yapılandırmanın en yaygın yolu,
bir dizi proje içeren tek bir çözüme sahip olmaktır.
Each project can then be made up of a series of both code files and folders.
Her proje daha sonra bir dizi kod dosyası ve klasörden oluşabilir.
BURAYA KATKI SAGLAYABILIRSINIZ
SOLUTION EXPLORER GIBI BIR YAPI BASKA IDELERDE VEYA ORTAMLARDA mesela Atollic Tia Portal matlab NASIL ADLANDRILIYOR
BURALARDA GOREVI NEDIR
veya SOLUTION EXPLORER HAKKINDA neler soyleyebilirsiniz VS veya baska ortamlar dahil
yorumlarinizla metni zenginlestirecegim
bana gore Solution Explorer projenin geneline erisebilecegimiz bir kullanim kolayligi saglayan arac gibi geldi
Hani Age of Empires oynarken sol altta oyun haritasi olur da tum alani izleyebilirsiniz ve ona gore nelere sahip oldugunuzu genel hatlariyla gorebilirsiniz ya onun gibi/
#SOLUTION FILE FORMAT / ÇÖZÜM DOSYASI BİÇİMİ
Visual Studio 2017 actually creates two files for a solution, with extensions .suo and .sln (solution file).
Visual Studio 2017 aslında bir çözüm için .suo ve .sln (çözüm dosyası) uzantılı iki dosya oluşturur.
The first of these is a rather uninteresting binary file and hence difficult to edit.
Bunlardan ilki oldukça ilgi çekici olmayan bir ikili dosyadır ve dolayısıyla düzenlenmesi zordur.
#SOLUTION FILE FORMAT - suo file
It contains userspecific information — for example, which files were open when the solution was last closed and the location of breakpoints.
Kullanıcıya özgü bilgiler içerir — örneğin, çözüm en son kapatıldığında hangi dosyaların açık olduğu ve kesme noktalarının konumu.
This file is marked as hidden,
so it won’t appear in the solution folder using Windows Explorer unless you enable the option to show hidden files.
Bu dosya gizli olarak işaretlenmiştir,
bu nedenle gizli dosyaları gösterme seçeneğini etkinleştirmediğiniz sürece Windows Gezgini'ni kullanarak çözüm klasöründe görünmez.
User information file that stores data in a structured binary format;
referenced by VSPackages created with Visual Studio;
opened by the LoadUserOptions Method
and modified by the WriteUserOptions and SaveUserOptions methods.
Verileri yapılandırılmış ikili biçimde depolayan;
Visual Studio ile oluşturulan VSPackages tarafından başvurulan;
LoadUserOptions Yöntemi tarafından açılan
ve WriteUserOptions ve SaveUserOptions yöntemleri tarafından değiştirilen kullanıcı bilgi dosyası.
Additionally, since SUO files change each time you use an associated Visual Studio solution (.SLN)
and they are saved in a binary format, they become difficult to place under version control.
Ayrıca, SUO dosyaları ilişkili bir Visual Studio çözümü (.SLN) kullandığınız her seferinde değiştiğinden
ve ikili biçimde kaydedildiğinden, sürüm denetimi altına alınmaları zorlaşır.
BURAYA KATKI SAGLAYABILIRSINIZ
suo file ile ilgili biraz daha detaylandirma yapablirim
#SOLUTION FILE FORMAT - sln file
A .sln file, short for solution file, is a text-based file generated by Visual Studio
to store information about the projects in your solution.
Çözüm dosyası anlamına gelen .sln dosyası, Visual Studio tarafından oluşturulan metin tabanlı bir dosyadır.
çözümünüzdeki projeler hakkında bilgi depolamak için
It acts as a container for multiple projects, facilitating their organization, build configurations, and dependencies.
Birden fazla proje için bir kapsayıcı görevi görerek bunların organizasyonunu, yapılandırmalarını ve bağımlılıklarını kolaylaştırır.
The .sln solution file contains information about the solution,
such as the list of projects, build configurations, and other settings that are not project-specific.
.sln çözüm dosyası, çözüm hakkında bilgi içerir
proje listesi, build yapılandırmaları ve projeye özgü olmayan diğer ayarlar gibi
This file plays a crucial role in managing your solution and project configurations.
Bu dosya çözümünüzü ve proje yapılandırmalarınızı yönetmede önemli bir rol oynar.
Unlike many files used by Visual Studio 2017,
the solution file is not an XML document.
Visual Studio 2017 tarafından kullanılan birçok dosyanın aksine,
çözüm dosyası bir XML belgesi değildir.
Understanding the structure of the .sln file is key to efficiently managing your C# projects.
.sln dosyasının yapısını anlamak, C# projelerinizi verimli bir şekilde yönetmek için önemlidir.
Instead, it stores information in blocks, as shown in the following example solution file:
Bunun yerine, aşağıdaki örnek çözüm dosyasında gösterildiği gibi bilgileri bloklar halinde depolar:
An SLN file is a structure file used for organizing projects in Microsoft Visual Studio.
SLN dosyası, Microsoft Visual Studio'da projeleri düzenlemek için kullanılan bir yapı dosyasıdır.
It contains text-based information about the project environment and project state.
Proje ortamı ve proje durumu hakkında metin tabanlı bilgiler içerir.
When opened, the preSolution, Project, and postSolution information is read from the SLN file.
Açıldığında, preSolution, Project ve postSolution bilgileri SLN dosyasından okunur.
This data is used to load the solution, projects within the solution, and any persisted information attached to the solution.
Bu veriler çözümü, çözüm içindeki projeleri ve çözüme eklenen kalıcı bilgileri yüklemek için kullanılır.
SLN files are similar to Windows Program Group (.VBG) files used by Visual Basic.
SLN dosyaları, Visual Basic tarafından kullanılan Windows Program Group (.VBG) dosyalarına benzer.
#SOLUTION PROPERTIES
Solution properties are stored in a Solution User Options (.suo) file.
Çözüm özellikleri bir Çözüm Kullanıcı Seçenekleri (.suo) dosyasında saklanır.
To access properties on the solution, right-click the solution node in Solution Explorer and select Properties.
Çözümdeki özelliklere erişmek için Çözüm Gezgini'nde çözüm düğümüne sağ tıklayın ve Özellikler'i seçin.
What you see in the context menu from the Solution node also depends on your project type, programming language, or platform.
Çözüm düğümündeki bağlam menüsünde gördükleriniz ayrıca proje türünüze, programlama dilinize veya platformunuza da bağlıdır.
You have three options when defining the startup project for an application,
and they’re somewhat self-explanatory.
Bir uygulama için startup project tanımlarken üç seçeneğiniz vardır
ve bunlar bir bakıma kendi kendini açıklar.
Selecting Current Selection starts the project
that has current focus in the Solution Explorer.
Current selection'i seçmek, projeyi başlatır
Solution Explorer de geçerli odak noktası olan (projeyi)
Single Startup Project ensures that the same project starts up each time.
Single Startup Project, her seferinde aynı projenin başlatılmasını sağlar.
This is the default selection
because most applications have only a single startup project.
Bu, varsayılan seçimdir
çünkü çoğu uygulamada yalnızca tek bir başlangıç projesi vardır.
You can use the drop-down list to indicate the single project that you need to start.
Başlatmanız gereken tek projeyi belirtmek için açılır listeyi kullanabilirsiniz.
The last option, Multiple Startup Projects,
allows for multiple projects to be started in a particular order.
Son seçenek olan Çoklu Başlangıç Projeleri,
birden fazla projenin belirli bir sırayla başlatılmasına olanak tanır.
This can be useful
if you have a client/server application specified in a single solution
and you want them both to be running.
Bu, yararlı olabilir
tek bir çözümde belirtilen bir istemci/sunucu uygulamanız varsa
ve her ikisinin de çalışmasını istiyorsanız
When running multiple projects,
it is also relevant to control the order in which they start up.
Birden fazla proje çalıştırırken,
bunların başlatılma sırasını kontrol etmek de önemlidir.
Use the up and down arrows next to the project list
to control the order in which projects are started.
proje listesinin yanındaki yukarı ve aşağı oklarını kullanın.
Projelerin başlatıldığı sırayı kontrol etmek için
Visual Studio allows you to specify how more than one project is run when you press F5 (Start with Debugging), or Ctrl+F5 (Start without debugging), or use the toolbar button to launch your application.
Visual Studio, F5'e (Hata Ayıklamayla Başlat) veya Ctrl+F5'e (Hata Ayıklama Olmadan Başlat) bastığınızda
veya uygulamanızı başlatmak için araç çubuğu düğmesini kullandığınızda birden fazla projenin nasıl çalıştırılacağını belirtmenize olanak tanır.
In this way, you could start multiple sites, apps, or services that depend on each other to work correctly during a debug session or just running and testing locally.
Bu şekilde, bir hata ayıklama oturumu sırasında veya yalnızca yerel olarak çalıştırıp test ederken doğru şekilde çalışmak için birbirine bağlı birden fazla site, uygulama veya hizmet başlatabilirsiniz.
The Project Dependencies section is used to indicate other projects
on which a specific project is dependent.
Proje Bağımlılıkları bölümü, diğer projeleri belirtmek için kullanılır
belirli bir projenin bağımlı olduğu (projeleri)
As shown in the pictures all the dependent projects are “Checked” .
Resimlerde görüldüğü gibi tüm bağımlı projeler “Checked”.
For the most part, Visual Studio manages this for you
as you add and remove Project references for a given project.
Visual Studio, çoğu durumda bunu sizin için yönetir
belirli bir proje için Proje referansları eklerken ve kaldırırken
However, sometimes you may want to create dependencies
between projects to ensure that they are built in the correct order.
Ancak bazen, bağımlılıklar oluşturmak isteyebilirsiniz
doğru sırayla oluşturulduklarından emin olmak için projeler arasında
Visual Studio uses its list of dependencies
to determine the order in which projects should be built.
Visual Studio, bağımlılıklar listesini kullanır
projelerin oluşturulacağı sırayı belirlemek için
This window prevents you from inadvertently adding circular references
and from removing necessary project dependencies.
Bu pencere, yanlışlıkla dairesel referanslar eklemenizi
ve gerekli proje bağımlılıklarını kaldırmanızı önler.
You can also visualize the dependency of projects using Code Map and I personally prefer this options.
Ayrıca projelerin bağımlılığını Code Map kullanarak görselleştirebilirsiniz ve ben şahsen bu seçeneği tercih ediyorum.
In this case, you don’t need to select individual projects from the dropdown to verify the dependency;
as this provides a complete view of dependencies.
Bu durumda, bağımlılığı doğrulamak için açılır listeden tek tek projeleri seçmenize gerek kalmaz;
çünkü bu, bağımlılıkların tam bir görünümünü sağlar.
The generated code map can display all the dependency references together.
Oluşturulan kod haritası, tüm bağımlılık referanslarını birlikte görüntüleyebilir.
Navigate to Architecture –> “Generate Code Map for Solution”
Mimariye gidin –> “Çözüm için Kod Haritası Oluştur”
This will generated the nice dependency diagram for the projects.
Bu, projeler için güzel bir bağımlılık diyagramı oluşturacaktır.
As shown in the below images, you can see how the projects / libraries are dependent on each other in a single view.
Aşağıdaki resimlerde gösterildiği gibi, projelerin / kütüphanelerin tek bir görünümde birbirlerine nasıl bağımlı olduğunu görebilirsiniz.
In the Debug Source Files section,
you can provide a list of directories
through which Visual Studio can search for source files when debugging.
Hata Ayıklama Kaynak Dosyaları bölümünde,
dizinlerin bir listesini sağlayabilirsiniz
Visual Studio'nun hata ayıklama sırasında kaynak dosyalarını arayabileceği (dizinlerin)
This property page specifies where the debugger will look for source files when debugging the solution.
Bu özellik sayfası, hata ayıklayıcının çözümü hata ayıklarken kaynak dosyalarını nerede arayacağını belirtir.
This is the default list that is searched before the Find Source dialog displays.
Bu, Kaynak Bul iletişim kutusu görüntülenmeden önce aranan varsayılan listedir.
You can also list source files
that Visual Studio should not try to locate.
Ayrıca, kaynak dosyalarını da listeleyebilirsiniz
Visual Studio'nun bulmaya çalışmaması gereken
If you click Cancel when prompted to locate a source file,
the file will be added to this list.
Bir kaynak dosyasını bulmanız istendiğinde İptal'e tıklarsanız,
dosya bu listeye eklenir.
The Code Analysis Settings section is available
only in the Visual Studio Enterprise edition.
Kod Analizi Ayarları bölümü kullanılabilir
yalnızca Visual Studio Enterprise sürümünde
This allows you to select the static code analysis rule set
that will be run for each project.
Bu, statik kod analizi kural kümesini seçmenize olanak tanır
her proje için çalıştırılacak
#Configuration Properties
Both projects and solutions have build configurations associated with them
that determine which items are built and how.
Hem projeler hem de çözümler, kendileriyle ilişkili build yapılandırmalarına sahiptir
hangi öğelerin nasıl oluşturulacağını belirleyen
It can be somewhat confusing because there is actually no correlation between
a project configuration, which determines how things are built,
and a solution configuration, which determines which projects are built,
other than they might have the same name.
Aslında arasında hiçbir ilişki olmadığından biraz kafa karıştırıcı olabilir
Bir project configuration, işlerin nasıl inşa edileceğini belirleyen
ve bir solution configuration, hangi projelerin inşa edileceğini belirleyen
aynı ada sahip olmaları dışında (hiçbir ilişki olmadığından)
A new solution defines both Debug and Release (solution) configurations,
which correspond to building all projects within the solution in Debug or Release (project) configurations.
bir new solution, Debug ve Release (çözüm) yapılandırmalarını tanımlar
ve bunlar, çözüm içindeki tüm projelerin Debug veya Release (proje) yapılandırmalarında oluşturulmasına karşılık gelir.
For example, a new solution configuration called Test can be created, which consists of two projects:
Örneğin, Test adlı yeni bir new solution oluşturulabilir ve bu yapılandırma iki projeden oluşur:
MyClassLibrary and MyClassLibraryTest.
When you build your application in Test configuration,
you want MyClassLibrary to be built in Release mode so that you’re testing as close to what you would release as possible.
Uygulamanızı Test yapılandırmasında oluşturduğunuzda,
MyClassLibrary'nin Release modunda oluşturulmasını istersiniz, böylece mümkün olduğunca release'e yakın testler yaparsınız.
However, to step through your test code, you want to build the test project in Debug mode.
Ancak, test kodunuzda adım adım ilerlemek için test projesini Hata Ayıklama modunda derlemek istersiniz.
When you build in Release mode, you don’t want the Test solution to be built or deployed with your application.
Release modunda derleme yaptığınızda, Test çözümünün uygulamanızla birlikte derlenmesini veya dağıtılmasını istemezsiniz.
In this case, you can specify in the Test solution configuration
that you want the MyClassLibrary project to be built in Release mode
and that the MyClassLibraryTest project should not be built.
Bu durumda, Test çözümü yapılandırmasında belirtebilirsiniz
Bu durumda, Test çözümü yapılandırmasında MyClassLibrary projesinin Release modunda derlenmesini
ve MyClassLibraryTest projesinin derlenmemesi gerektiğini belirtebilirsiniz.
The Configuration drop-down contains each of the available solution configurations
(Debug and Release by default, Active, and All).
Yapılandırma açılır menüsü, mevcut çözüm yapılandırmalarının her birini içerir
(varsayılan olarak Hata Ayıklama ve Yayınlama, Etkin ve Tüm).
Similarly, the Platform drop-down contains each of the available platforms.
Benzer şekilde, Platform açılır menüsü mevcut platformların her birini içerir.
Whenever these drop-downs appear and are enabled,
you can specify the settings on that page on a per-configuration and per-platform basis.
Bu açılır menüler göründüğünde ve etkinleştirildiğinde,
o sayfadaki ayarları yapılandırma ve platform bazında belirtebilirsiniz.
You can also use the Configuration Manager button to add additional solution configurations and platforms
Ek çözüm yapılandırmaları ve platformlar eklemek için Configuration Manager butonunu da kullanabilirsiniz
When adding solution configurations,
there is an option (checked by default) to create corresponding project configurations for existing projects
(-- projects will be set to build with this configuration by default for this new solution configuration --),
and an option to base the new configuration on an existing configuration.
Çözüm yapılandırmaları eklerken,
mevcut projeler için karşılık gelen proje yapılandırmalarını oluşturma seçeneği (varsayılan olarak işaretlidir)
(-- projeler, bu yeni çözüm yapılandırması için varsayılan olarak bu yapılandırmayla oluşturulacak şekilde ayarlanacaktır--)
ve yeni yapılandırmayı mevcut bir yapılandırmaya dayandırma seçeneği vardır.
If the Create Project Configurations option is checked
and the new configuration is based on an existing configuration,
the new project configuration copies the project configurations specified for the existing configuration.
Proje Yapılandırmalarını Oluştur seçeneği işaretliyse
ve yeni yapılandırma mevcut bir yapılandırmaya dayanıyorsa,
yeni proje yapılandırması mevcut yapılandırma için belirtilen proje yapılandırmalarını kopyalar.
The other thing you can specify in the solution configuration file is
the type of CPU for which you are building.
Çözüm yapılandırma dosyasında belirtebileceğiniz diğer şey,
oluşturduğunuz CPU türüdür.
This is particularly relevant if you want to deploy to 64-bit architecture machines.
Bu, özellikle 64 bit mimarili makinelere dağıtım yapmak istiyorsanız önemlidir.
The options available for creating new platform configurations are
limited by the types of CPU available: x86 and x64.
Yeni platform yapılandırmaları oluşturmak için kullanılabilen seçenekler,
kullanılabilen CPU türleriyle sınırlıdır: x86 ve x64.
You can reach all these solution settings directly from the right-click context menu
from the Solution node in the Solution Explorer window.
Tüm bu çözüm ayarlarına doğrudan sağ tıklama context menüsünden ulaşabilirsiniz
Solution Explorer penceresindeki Solution node dan .
Whereas the Set Startup Projects menu item opens the Solution Configuration window,
the Configuration Manager, Project Dependencies, and Project Build Order items
open the Configuration Manager and Project Dependencies windows.
Başlangıç Projelerini Ayarla menü öğesi Çözüm Yapılandırma penceresini açarken,
Yapılandırma Yöneticisi, Proje Bağımlılıkları ve Proje Yapım Sırası öğeleri
Yapılandırma Yöneticisi ve Proje Bağımlılıkları pencerelerini açar.
The Project Dependencies and Project Build Order menu items
will be visible only if you have more than one project in your solution.
Proje Bağımlılıkları ve Proje Yapım Sırası menü öğeleri
yalnızca çözümünüzde birden fazla proje varsa görünür olacaktır.
When the Project Build Order item is selected,
this opens the Project Dependencies window
and lists the build order, as shown in Figure 6-4.
Proje Yapım Sırası öğesi seçildiğinde,
bu Proje Bağımlılıkları penceresini açar
ve Şekil 6-4'te gösterildiği gibi yapı sırasını listeler.
This tab reveals the order in which projects will be built, according to the dependencies.
Bu sekme, projelerin bağımlılıklara göre hangi sırayla oluşturulacağını gösterir.
This can be useful if you maintain references to project binary assemblies rather than Project references,
and it can be used to double-check that projects are built in the correct order.
Bu, Proje referansları yerine proje ikili derlemelerine referanslar tutuyorsanız yararlı olabilir
ve projelerin doğru sırayla oluşturulduğunu iki kez kontrol etmek için kullanılabilir.
")